SnapSlide

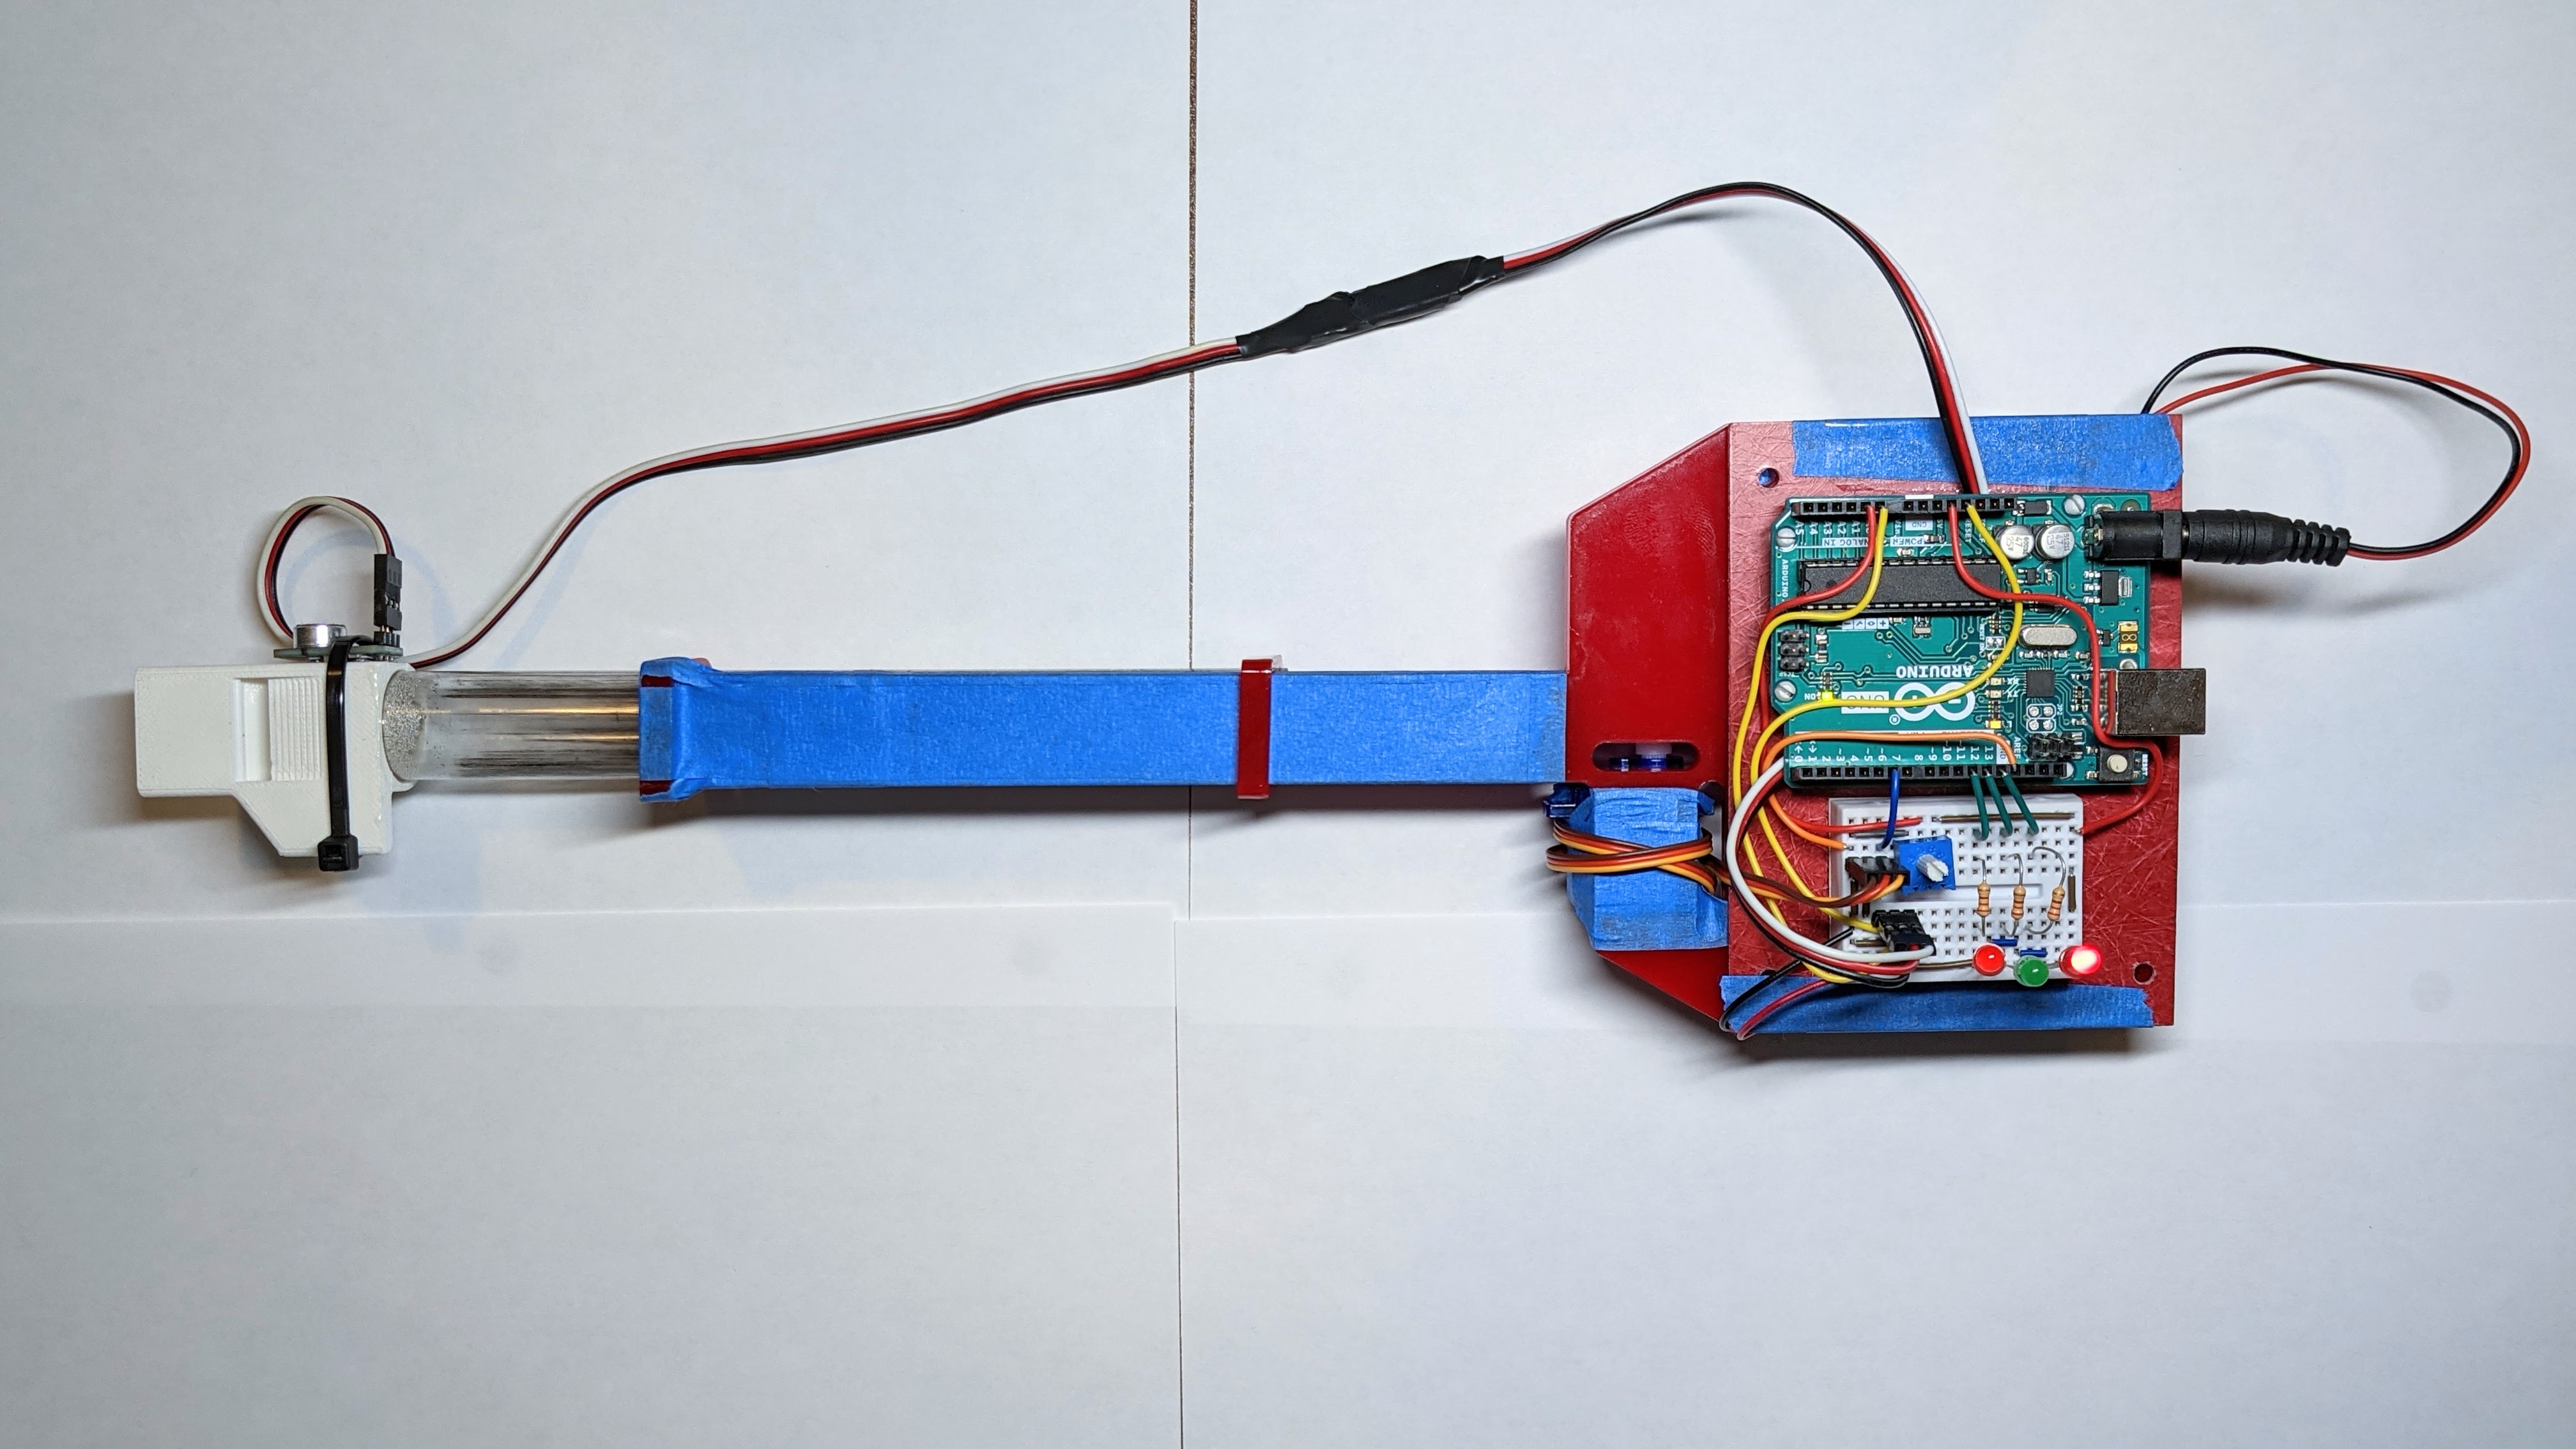
SnapSlide is a slide whistle that tries to fix your imprecise slide positioning with a servo. A microphone at the mouthpiece listens for a note, and when there is one, the Arduino does a discrete fourier transform to quickly find the note’s frequency. Based on that frequency and on an arbitrary set of “desirable” frequencies (e.g. the set of frequencies that correspond to the white keys on a piano), the Arduino estimates how far it needs to move the slide to get to the “desirable” pitch. Once that’s done, it tells the servo to move the slide to the desired position. Since this type of control results in a feedback loop, SnapSlide uses a PID algorithm. The P term is the most important, so SnapSlide’s potentiometer is used to adjust it. And the three LEDs indicate which direction (if any) the slide is being moved to correct a slide position.
Design considerations
The biggest challenges with this project were:
- Minimizing friction while keeping the tube sealed tight (essential to make a good sound)
- Tuning the PID control algorithm
- Not driving my housemates crazy by making slide whistle sounds for hours on end
If I were to redo this project on the same budget, I would reconsider how to measure the pitch in the first place. The discrete fourier transform is fast and precise, but it’s inaccurate and doesn’t react until the pitch has already changed — plus, it requires a PID control loop. It might be better to measure the position of the human-held slide, because that position would have no backlash (and therefore no delay) between it and the musician’s input. That option would also avoid PID control, because the set of “desirable” slide positions is just a function of the main slide position. The reason I opted for the microphone was to hopefully correct for variations in blowing pressure, but the friction in the system is too high for that to be achievable (so I think the cost outweighs the benefit).
With another month and 20 more dollars, I would have considered using a real slide whistle (about $20 on Amazon) instead of buying and cutting parts to make one. This would have the benefit of guaranteeing a good seal and low friction, but it would pose slightly more of a challenge to design mounts for the electronics. A faster servo, a stiffer servo arm, and a better attachment to the scotch yoke also come to mind — these would make big performance improvements but would probably collectively bring the budget up by more than $20.
Assembly Instructions
Assemble the major parts
I plan to post the files for SnapSlide to Thingiverse. Coming soon!
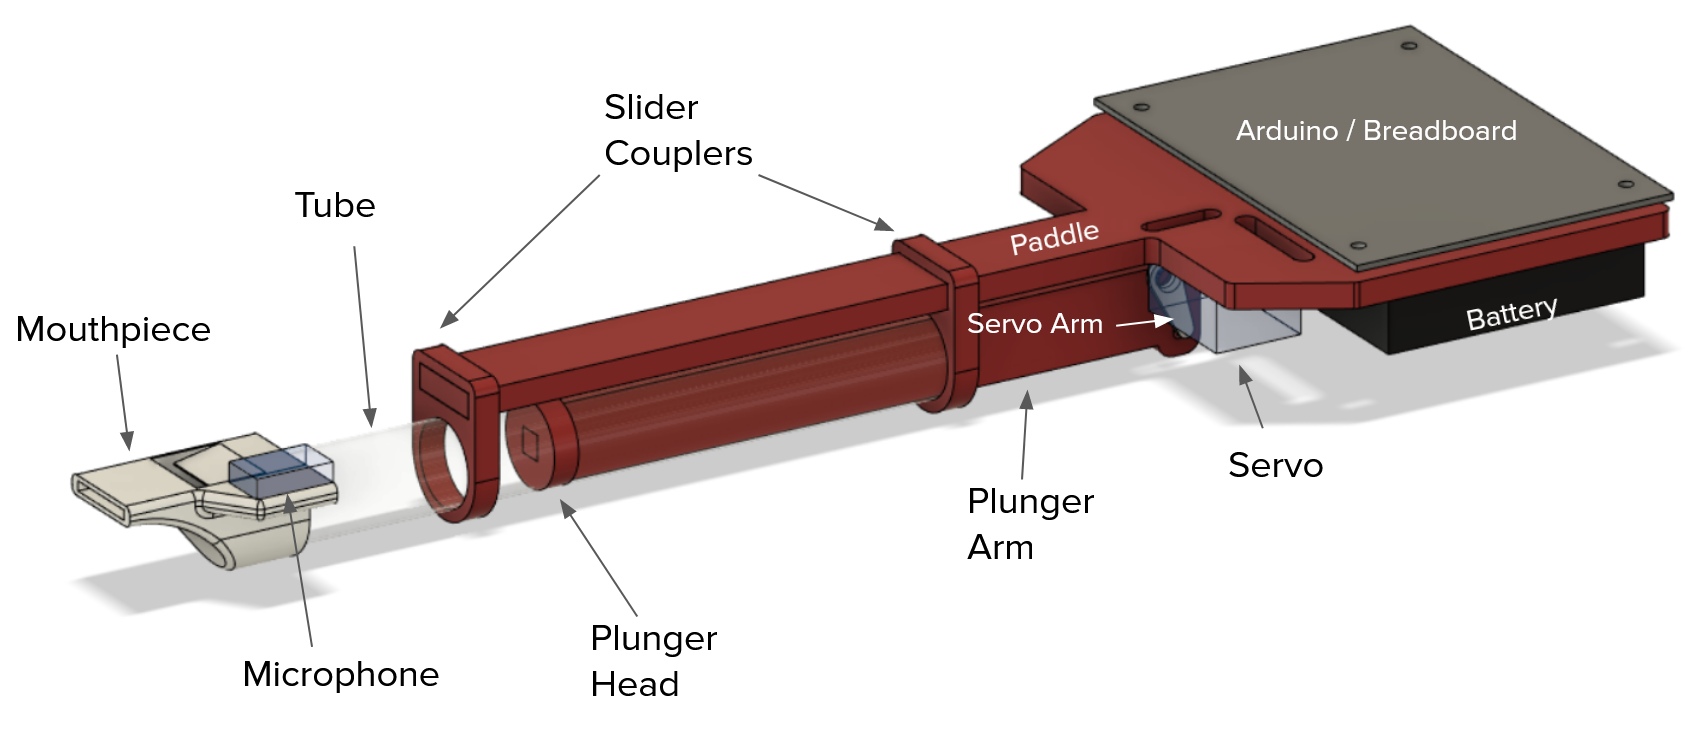
- 3D print the mouthpiece (see above for a visual map of major parts). PLA is a great material for this, and 0% infill works fine. If the circular opening is placed on the build plate, supports aren’t necessary since there’s just one short bridge and some overhangs.
- Laser-cut the acrylic parts. These are designed with 0.25” thickness in mind, and there are three disks for the plunger so you can choose the one with the best size.
- Cut the plastic tube to about 18 cm. Check the fit with the mouthpiece: if it’s too tight, you may need to reprint the mouthpiece larger, but if it’s a little loose that’s okay.
- Slide one slider coupler onto the paddle. Check the fit and add layers of tape to the paddle until the slider coupler slides with friction.
- File the circular hole in the other slider coupler until it slides loosely along the tube. Then tape it onto the end of the paddle. Use the tape to provide a natural stopping point for the first slider coupler as you slide it towards the end.
- Tape the Arduino to the top of the paddle, and tape the battery pack and 9V battery to the underside.
- Thread tape through the slit that runs across (not along) the paddle. Then wrap the tape around the servo to secure it underneath the paddle. The head of the servo should not quite reach the paddle’s centerline.
- Find the plunger disk that just barely doesn’t fit in the tube. File it down until it fits snugly in the tube while sliding with as little friction as possible.
- Epoxy time: mix the epoxy packet and apply epoxy to join:
- The mouthpiece onto the tube (make sure the epoxy makes an airtight seal)
- The plunger disk onto the plunger arm (an airtight seal is important here too)
- Wait for the epoxy to cure.
- File down the plunger disk until the plunger assembly slides easily through the tube (but not so much that the seal is compromised — check frequently to make sure the whistle still sounds good). Apply graphite to the disk as a dry lubricant (by drawing on it with a pencil).
- Test the range of the servo and apply that range in the code by setting SERVO_MIN and SERVO_MAX. Be careful not to break the servo arm if you install it for testing.
- Put a screw in the servo arm so that it will stick into the slot of the plunger arm.
- Attach the servo arm to the servo.
- Slide the tube/mouthpiece assembly through the slider couplers.
- Slide the plunger arm into the tube. Make sure the servo’s screw protrudes into the slot on the plunger arm.
Wire it up
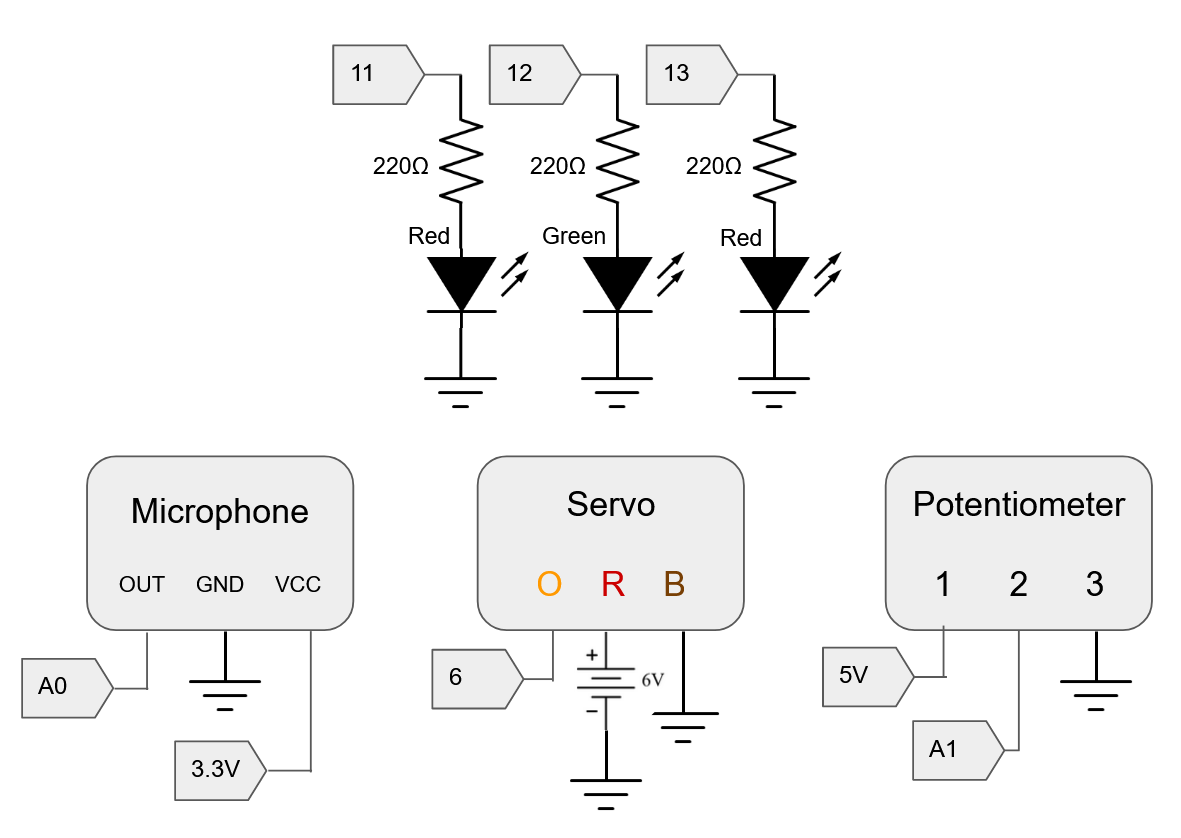
SnapSlide's circuit diagram. The arrow-shaped boxes are Arduino pins.
- Attach the microphone to the mouthpiece with a zip tie and loop the wire under it to relieve stress on the pins.
- Use a mini breadboard next to the Arduino to make all the connections shown in the circuit diagram.
Great job — you now have a SnapSlide!